How to Transfer eSIM from Android to iPhone: Your 2025 Guide
Learn how to transfer eSIM from Android to iPhone with this step-by-step guide. Check compatibility, explore carrier methods, troubleshoot issues, and discover the best international eSIM plans for seamless travel.
Learn how to transfer eSIM from Android to iPhone with this step-by-step guide. Check compatibility, explore carrier methods, troubleshoot issues, and discover the best international eSIM plans for seamless travel.
Switching from an Android phone to a brand-new iPhone is exciting, but it also comes with its fair share of questions. One of the biggest ones today is how to transfer eSIM from Android to iPhone. Since more carriers around the world now support eSIM, this digital SIM card has replaced the hassle of plastic SIM swaps. But moving it between two different operating systems can feel intimidating if you’ve never done it before.
The good news is you don’t need to worry. With the right preparation, transferring your eSIM can be quick, smooth, and secure. In this guide, you’ll learn everything you need to know, from checking compatibility and preparing your devices to trying different transfer methods and troubleshooting common issues. We’ll also show you why choosing the right international eSIM plan can make all the difference when traveling.
What is eSIM, and Why Transfer from Android to iPhone?
An eSIM, or “embedded SIM,” represents the next step in mobile technology. Instead of swapping out physical cards, you download a carrier profile directly to your device. This profile allows your smartphone to connect to mobile networks without the need for physical hardware.
eSIM vs Physical SIM
The differences between eSIM and a traditional SIM card are striking. With a physical SIM, you are limited to one card at a time, and transferring your service often requires waiting in line at a carrier store or fumbling with small trays and tools. In contrast, an eSIM allows you to activate or switch plans digitally. You can store multiple profiles simultaneously and toggle between them as needed, whether for work, travel, or personal use.
Key benefits of moving your eSIM
Beyond convenience, there are several advantages that make this transfer worthwhile in 2025.
No need for a physical SIM card. You avoid the risk of losing or damaging a tiny plastic chip, since everything is handled digitally.
Flexibility for international use. You can keep one plan for your home network and another for data roaming, switching between them in seconds.
Better security. With no physical card to steal or clone, eSIMs add an extra layer of protection against fraud.
Seamless continuity. Your phone number, carrier services, and international eSIM plans move with you, so you stay connected without downtime.
If you’re upgrading to an iPhone, learning how to transfer eSIM from Android to iPhone ensures you don’t lose connectivity during the switch.

Check Device and Carrier Compatibility
Before you do anything else, make sure both your new iPhone and your carrier are ready for eSIM.
iPhone models that support eSIM
Apple introduced eSIM compatibility with the iPhone XS, XS Max, and XR. Every iPhone released since has maintained this feature. As of 2025, Apple has even produced eSIM-only devices in certain regions, eliminating physical SIM slots altogether. If you are purchasing a new iPhone today, it almost certainly supports eSIM.
How to confirm your carrier supports eSIM transfer
While many global carriers have adopted eSIM, not all of them allow cross-platform transfers from Android to iOS. To avoid frustration, check your carrier’s website for an eSIM support page or call their customer service line. Look specifically for instructions on how to transfer eSIM from Android to iPhone. If your carrier does not provide a direct transfer option, they will likely issue you a new activation QR code.
Pre-Transfer Preparation Checklist
Before you move your eSIM from Android to iPhone, take care of these essentials:
Back up your Android phone Data
Start by backing up your Android device. You can use Google Drive or connect it to a computer to save contacts, photos, and messages. This way, even if something goes wrong, you won’t lose your data.
Ensure a stable internet connection
Both devices need an internet connection to activate the eSIM. You should connect to Wi-Fi before starting so your iPhone can download the eSIM profile quickly.
Update the software on both devices
Check for updates on both your Android and your iPhone. Installing the latest software reduces bugs and makes sure both devices work with your carrier’s system.
Gather your carrier info/activation codes or QR code
You may need your carrier account login, an activation code, or a QR code to complete the setup. Keep this information ready so you don’t have to stop halfway through.
Different Methods to Transfer eSIM from Android to iPhone
Carriers provide different methods for transferring eSIMs between devices. Here are the four methods to transfer your eSIM from Android to iPhone:
Method 1 – Using Carrier activation
Some carriers allow you to log in to your online account and register your new iPhone by entering its IMEI number. Once that’s done, the carrier automatically pushes the eSIM profile to your device.
How to do it:
Log in to your carrier’s website or online account.
Find the option to manage devices or SIM cards.
Enter your iPhone’s IMEI number (found in Settings > General > About).
Confirm the request, and your carrier will push the eSIM to your iPhone.
Follow the on-screen prompts to complete setup.
Method 2 – Using carrier app
If your carrier has an app, you can usually download it on your iPhone, log in, and choose an option like “Add eSIM.” This is one of the easiest methods to install eSIM on iPhone.
How to do it:
Download your carrier’s official app from the App Store.
Log in with your account credentials.
Look for an option like “Add eSIM” or “Set up device.”
Select your new iPhone as the target device.
The app will automatically install the eSIM profile.
Method 3 – QR code transfer
Many carriers provide a QR code you can scan to activate your eSIM. This method also works if you want to move your eSIM to another iPhone later on.
How to do it:
Ask your carrier to send you a QR code for eSIM activation.
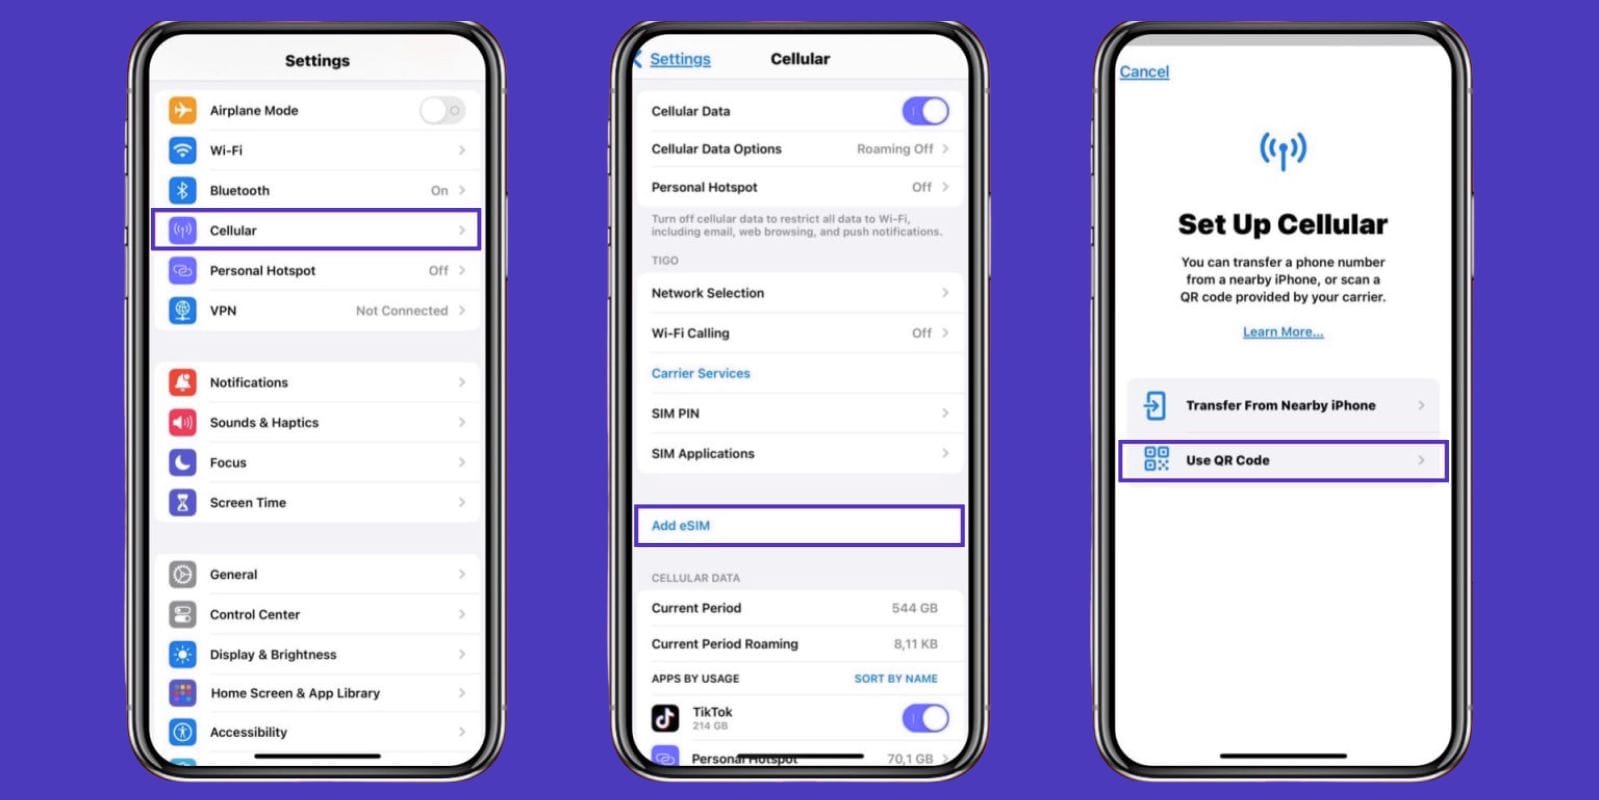
On your iPhone, go to Settings > Cellular > Add Cellular Plan.
Use the camera to scan the QR code.
Follow the on-screen instructions to finish setup.
Once activated, your eSIM will appear under Cellular Plans.
Method 4 – Manual activation with code
If no other option works, your carrier may give you activation details like an SM-DP+ address and activation code. You can enter these manually on your iPhone to complete the transfer. If you are still not sure how to install eSIM in iPhone, your carrier’s support can guide you through each step.
How to do it:
Contact your carrier for manual eSIM activation details (SM-DP+ address, activation code, confirmation code).
On your iPhone, go to Settings > Cellular > Add Cellular Plan.
Choose “Enter Details Manually.”
Type in the information provided by your carrier.
Save and confirm to finish the activation.
Step-by-Step Instructions for Transferring eSIM
The process of moving an eSIM from Android to iPhone can feel technical, but it’s something you can do yourself. Here are step-by-step instructions for how to transfer eSIM from Android to iPhone:
Remove or deactivate eSIM on Android
The first step involves removing the eSIM profile from the Android device. Go into your Android settings and locate the SIM Manager or Connections section. Remove or deactivate the eSIM profile so your iPhone can take it over. If you skip this, your Android may block the activation on your new phone.
Add and activate eSIM on iPhone
On your iPhone, open Settings and tap Cellular. Select Add Cellular Plan. Depending on your carrier, you may need to scan a QR code, log into a carrier app, or enter activation codes. Follow the method provided by your carrier until the plan appears in your settings. When your iPhone shows signal bars, your eSIM should be active. Make a quick call or open a webpage to test it. If nothing happens right away, restart your phone and try again.
Verify eSIM Activation on Your iPhone
Verifying your eSIM activation ensures that your iPhone is ready to serve as the primary device without interruption.
Check mobile data and call functionality
Try calling a contact and using mobile data to confirm that both services are active. If the call connects and a webpage loads, your eSIM is working.
What about your Android – will it be deactivated?
Check your Android phone to confirm that the eSIM no longer works there. Once you’ve moved the profile, your old device won’t connect to the network using that eSIM.
Troubleshoot if eSIM isn’t showing
If your eSIM doesn’t appear on your iPhone, restart it and try the activation again. Sometimes, carriers may take a few minutes to complete the process on their end.
Common Issues and Troubleshooting Tips
Even with careful preparation, problems can arise. Recognizing common issues and their solutions helps avoid frustration.
QR code not scanning
If your QR code doesn’t scan, clean your iPhone’s camera lens and make sure the room has good lighting. If the problem continues, you can request a new QR code from your carrier to resolve the issue.
Carrier doesn’t support transfer
If your carrier doesn’t allow direct transfers from Android to iPhone, you need to request a new eSIM profile made for your iPhone.
Activation stuck or cellular plan not appearing
If your iPhone freezes during activation, restart both phones and try again. Carriers sometimes experience slight delays that clear up after a few minutes.
What to check if you can’t make calls or use data
If you can’t make calls or use mobile data after transfer, check your iPhone settings to confirm mobile data is on. If you’re traveling, make sure data roaming is enabled. This is also important if you plan to use an eSIM for international travel.
Quick Recap – How to Transfer eSIM in 5 Steps
To move your eSIM from Android to iPhone, you should first confirm that your devices and carrier support eSIM. Back up your Android data, update both phones, and keep your carrier information ready. Remove the eSIM from your Android, then add and activate it on your iPhone using the method your carrier provides. Once you confirm that calls and data work, your transfer is complete. If you ever upgrade again, the same steps apply when you need to transfer eSIM to another iPhone.
Why Choose Jetpac eSIM for Seamless Connectivity
Once your local eSIM is active, you may want an option that keeps you connected while traveling. Jetpac makes this easy with international eSIM plans and affordable eSIM for international travel.
Benefits of Jetpac vs other providers
When comparing Jetpac with other eSIM providers, you may notice some differences. Jetpac focuses on flexibility, transparency, and reliability, which makes it a strong choice for travelers who value convenience.
Transparent pricing. Jetpac keeps costs straightforward without hidden roaming fees that surprise you after a trip.
Wide global coverage. You can travel across multiple countries on the same plan instead of juggling different carriers.
One plan for entire regions. Jetpac covers areas like Europe, Asia, and North America with a single package.
Reliable customer support. You can get help when you need it, which is essential if you run into issues while abroad.
These advantages give you peace of mind, letting you focus on your trip rather than worrying about complicated mobile setups. By choosing Jetpac, you gain a travel partner that works across borders and keeps you connected wherever you go.
Easy setup for global travel
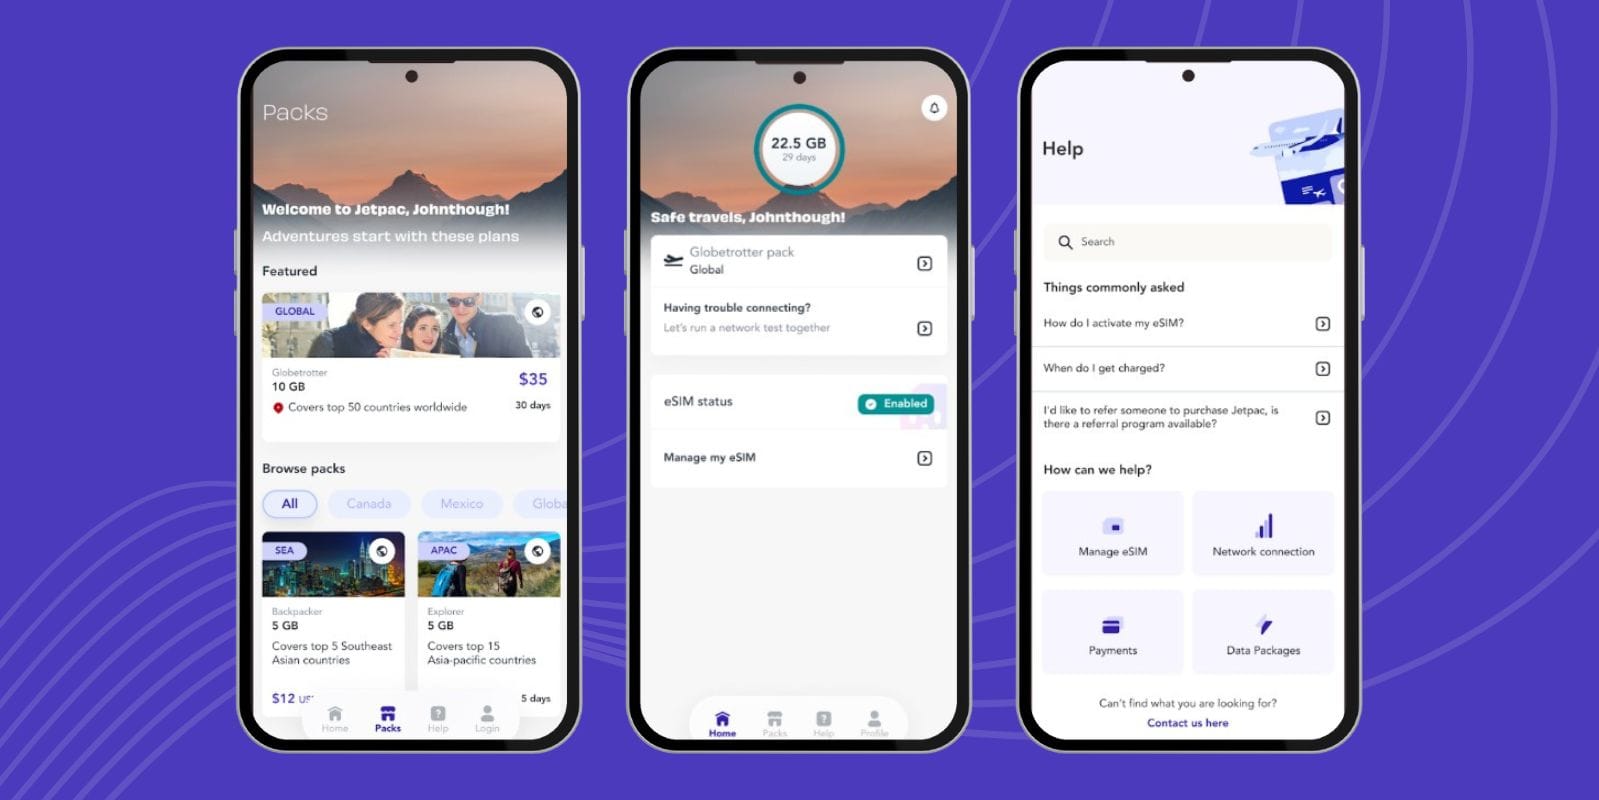
Setting up Jetpac is quick and simple, which makes it especially helpful if you don’t want to waste time dealing with tech while preparing for a trip. The process takes only a few minutes from purchase to activation.
Instant QR code delivery. Once you buy a plan online, Jetpac sends you a QR code for activation.
Fast activation on iPhone. You go to Settings > Add Cellular Plan, scan the code, and the plan activates right away.
No physical SIM needed. You avoid waiting for delivery or carrying around small cards.
Test before you travel. You can activate and confirm the plan at home so you know it works when you land.
This simple process makes Jetpac stand out among international eSIM providers. Instead of worrying about connectivity, you start your trip with confidence, already connected the moment you arrive at your destination.
FAQ
How to move an eSIM from Android to iPhone?
To move your eSIM, you should first remove or deactivate it on your Android phone. Then, on your iPhone, go to Settings > Cellular > Add Cellular Plan. Depending on your carrier, you may scan a QR code, log in through their app, or enter an activation code. Once complete, you can test calls and data to confirm that the transfer was successful.
How to get eSIM QR code from Android?
You can request a QR code directly from your carrier. Most carriers provide it through their customer portal, mobile app, or support team. Once you receive the QR code, scan it with your iPhone's camera to activate the eSIM.
How to transfer eSIM without QR code?
If your carrier doesn’t issue QR codes, you can usually transfer your eSIM by using their app or by entering activation details manually. Some carriers allow you to log in to their app on your iPhone, which pushes the eSIM profile directly to the device.
Do all Android carriers offer eSIM?
Not all carriers support eSIM yet. Larger carriers in North America, Europe, and Asia have adopted it widely, but smaller regional providers may still rely on physical SIM cards. You should always check with your carrier before you begin the transfer.
I'm facing issues transferring the eSIM. What should I do?
If you encounter any issues, restart both phones and ensure they have the latest software updates. You can also repeat the activation process, since carriers sometimes take a few minutes to confirm the transfer. If the issue continues, contacting your carrier’s support team is the best way to resolve it.
Are there any fees associated with transferring an eSIM?
Most carriers let you transfer your eSIM for free, but some may charge a small administrative fee for issuing a new profile. It’s best to ask your carrier in advance to determine if there will be any costs.
What happens if my carrier doesn't support eSIM transfer?
If your carrier doesn’t support direct transfers from Android to iPhone, you can request a new eSIM profile designed for your iPhone. The process is similar to activating a new line, but it keeps your existing number and service.