How to Transfer eSIM to New iPhone From iPhone or Android
Learn how to transfer an eSIM to a new iPhone from an iPhone or Android. Step-by-step guide for setup, QR activation, and troubleshooting tips.
You can transfer your eSIM to a new iPhone in minutes using Apple’s Quick Transfer, manual setup, or a carrier QR code. If you’re switching from Android, deactivate the eSIM on your old phone first, then scan your carrier’s new QR code on the iPhone to activate it. Always ensure both devices have Wi-Fi and updated software. If activation fails, request a new QR code from your carrier. For seamless data access while switching or traveling, an international eSIM like Jetpac keeps you connected instantly.
Upgrading to a new iPhone is exciting, but transferring your mobile plan can be confusing, especially if you’re using an eSIM. The good news is that it’s simpler than it sounds. Whether you’re moving from one iPhone to another or switching from Android, you can transfer your eSIM to a new iPhone in just a few minutes.
This blog explains every method, automatic, manual, and QR-based, plus what to check before you start. We’ll also cover what to do if the transfer doesn’t work and how to stay connected during the switch using an international eSIM like Jetpac.
Can I Transfer My eSIM to Another iPhone?
Yes, you can, but how you do it depends on your carrier and phone model. Most modern carriers and iPhones support eSIM Quick Transfer, which allows you to move your plan automatically from your old iPhone to your new one.
If your carrier doesn’t yet support automatic transfer, you can still move your eSIM using a QR code or by contacting your provider for reactivation. The process is secure and only takes a few minutes once both devices are updated and connected to Wi-Fi.
Before you start:
Make sure both phones are nearby and have Wi-Fi access.
Check that both devices are updated to iOS 16 or later.
Confirm that your old phone’s eSIM plan is active and your new iPhone supports eSIM (all iPhone 14 and later models do).
And if you travel frequently, this is a great time to install a Jetpac eSIM. It keeps you connected during setup and while you’re moving between countries, without relying on Wi-Fi or physical SIMs.
What to Know Before You Transfer Your eSIM to a New iPhone
Before you begin the transfer process, there are a few technical steps worth checking to ensure everything goes smoothly. eSIMs aren’t physically moved like traditional SIM cards; they’re digitally reactivated on your new device. Making sure your setup is ready will prevent activation errors or connectivity issues.
Here’s what to confirm before you transfer eSIM to a new iPhone:
1. Check Carrier Support
Not every mobile carrier supports eSIM Quick Transfer. If yours doesn’t, you’ll need to reactivate the plan using a new QR code. Visit your carrier’s website or contact customer support to verify compatibility before you start.
2. Keep Both Phones Nearby
Apple’s Quick Transfer method uses Bluetooth and Wi-Fi to detect your old iPhone. Keep both phones close to each other during the setup or transfer process.
3. Update iOS on Both Devices
Ensure your old and new iPhones are running iOS 16 or later, as older versions may not support automatic eSIM transfers. You can update via Settings → General → Software Update.
4. Backup Your Data
Before transferring, back up your phone using iCloud or your computer. While eSIM data itself isn’t stored in backups, your contacts, messages, and settings are, making it easier to set up your new device seamlessly.
5. Don’t Delete Your eSIM Yet
Wait until your eSIM is activated and working on your new iPhone before deleting it from the old one. Removing it too soon can interrupt the transfer and force a carrier reactivation.
Once these checks are complete, you’re ready to transfer your eSIM to another iPhone, either automatically during setup or manually afterward.
How to Transfer eSIM to a New iPhone From an Old iPhone
Apple gives you two main ways to transfer eSIM to a new iPhone: automatically during setup or manually after your new phone is already running. Both are simple, but the method you use depends on whether you’re setting up your iPhone for the first time or have already completed setup.
1. Automatic Transfer During Setup
If your carrier supports eSIM Quick Transfer, you can move your eSIM to your new iPhone while setting it up for the first time.
Here’s how:
Turn on your new iPhone and place it near your old one.
Follow the on-screen setup steps until you reach the “Set Up Cellular” or “Transfer eSIM” prompt.
Tap Transfer from Nearby iPhone.
Confirm on your old iPhone when asked to approve the transfer.
Wait for activation, your carrier will automatically move your number and data plan to the new phone.
Once complete, test your network by making a call or using mobile data. You can now delete the eSIM from your old iPhone.
2. Manual Transfer After Setup
If you’ve already set up your new iPhone, you can still transfer your eSIM manually.
Steps:
On your new iPhone, go to Settings → Cellular → Add Cellular Plan.
Tap Transfer from Nearby iPhone.
Confirm on your old iPhone when prompted.
Wait for the activation message, then restart your new iPhone.
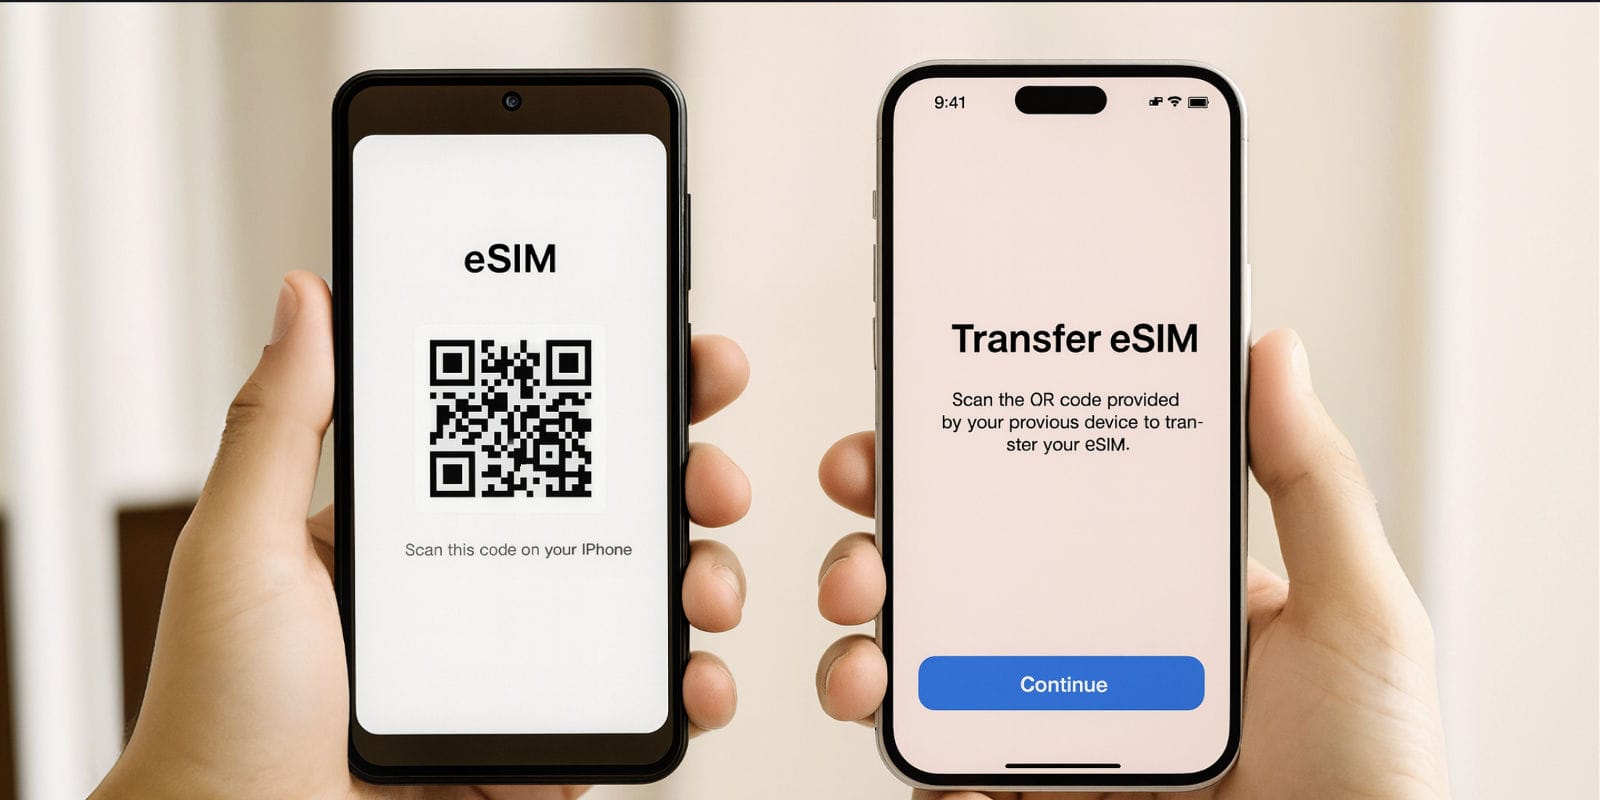
3. Transfer Using a QR Code (Carrier Activation)
If your carrier doesn’t support Quick Transfer, you’ll need to use a QR code provided by your carrier.
To do this:
Contact your carrier for a new eSIM QR code.
On your new iPhone, open Settings → Cellular → Add eSIM → Use QR Code.
Scan the QR code and follow the prompts.
Once activated, test your connection, then remove the eSIM from your old device.
Each method securely transfers your plan, your phone number, and data stays the same. The process only takes a few minutes when both devices are connected to Wi-Fi.
How to Transfer eSIM to a New iPhone from Android
Switching from Android to iPhone takes a few extra steps since the two systems handle eSIMs differently, but the process is still quick once you prepare both devices. Here’s how to transfer eSIM to a new iPhone from Android safely and correctly.
1. Check Carrier Compatibility
Not all carriers allow cross-platform eSIM transfers. Confirm with your carrier that they support eSIM activation on iPhone and can issue a new QR code or activation link.
2. Remove or Deactivate the eSIM on Your Android Phone
Before activating the eSIM on your iPhone, delete or deactivate it from your Android phone:
Go to Settings → Network & Internet → SIMs → Delete or Remove eSIM.
Wait for your carrier to confirm that the old eSIM has been deactivated.
This step ensures the same plan can be activated on your new iPhone without conflict.
3. Add the eSIM to Your New iPhone
Once your carrier has confirmed deactivation, activate your eSIM on the iPhone:
On your iPhone, open Settings → Cellular → Add eSIM.
Choose Use QR Code and scan the new code from your carrier.
Follow the prompts until activation is complete.
If your carrier uses an app for eSIM setup, download it from the App Store and log in to activate your plan.
4. Activate and Test Your Connection
Once the eSIM is installed, make a test call or use mobile data to confirm your network is active. If you’re transferring an international or travel eSIM, make sure roaming is enabled.
5. Set Your Primary SIM (If Dual SIM)
If you plan to use both your home number and your new eSIM, go to Settings → Cellular → Default Line to choose which number handles calls, messages, and data.
That’s it, your eSIM plan is now live on your iPhone. If you’re switching devices before an international trip.
Troubleshooting: Why isn’t my eSIM Transferring to the New iPhone?
If you’ve followed the steps but your eSIM isn’t activating, don’t worry, a few common issues can interrupt the process. Most problems come down to carrier settings, software versions, or incomplete deactivation on the old device. Here’s how to fix them.
1. Your Carrier Doesn’t support eSIM Transfer
Some carriers haven’t enabled eSIM Quick Transfer or cross-platform activation. If you don’t see the “Transfer from Nearby iPhone” option, contact your carrier and request a new QR code for manual setup.
2. eSIM Still Active on the Old Device
If your old phone still shows an active eSIM, it may block activation on the new one. Delete or deactivate it after your new iPhone has successfully activated the eSIM.
Tip: Always wait until the transfer completes before removing it from the old device.
3. Outdated Software
Make sure both phones are updated. On iPhone, go to Settings → General → Software Update; on Android, check System Updates. Running older versions can cause compatibility errors.
4. QR Code Already Used or Expired
If your carrier-issued QR code doesn’t work, ask for a replacement. Most QR codes can only be used once or within a short validity period.
5. Connectivity Problems During Transfer
eSIM setup requires a stable Wi-Fi connection. If the process stops midway, restart both devices and reconnect to a stronger network before retrying.
6. Activation Delay from the Carrier
Sometimes the carrier’s system takes a few minutes to complete activation. Wait up to 10 minutes, then restart your iPhone. If it still doesn’t activate, contact support to refresh your line.
In most cases, retrying the activation with a new QR code or updating the software solves the problem. For travelers, having a backup plan like a Jetpac International eSIM helps you stay connected immediately, even if your main carrier transfer takes longer than expected.
How to Know if Your eSIM Transfer Was Successful
Once you’ve completed the setup, it’s easy to confirm whether your eSIM is active and working properly on your new iPhone. Here’s how to check:
1. Check the Network Connection
Go to Settings → Cellular (or Mobile Data) and verify that your carrier name appears under “Cellular Plans.” You should also see signal bars in the top corner of your screen.
If the signal is weak or missing, toggle Airplane Mode on and off once — this forces the iPhone to reconnect to the carrier network.
2. Make a Test Call or Use Data
The simplest way to verify a successful transfer is to make a call or open a web page using mobile data. If both work, your eSIM transfer to the new iPhone is complete.
3. Remove the eSIM from the Old Device
Once the new iPhone is fully active, delete the eSIM plan from your old phone to prevent duplicate connections. On your previous iPhone, go to Settings → Cellular → Select Plan → Delete eSIM.
4. Update Carrier Settings (Optional)
If prompted, install carrier updates on your new phone. This ensures optimal performance for voice, data, and international roaming.
5. Restart for Final Confirmation
A quick restart helps finalize the configuration. After rebooting, your carrier name should reappear instantly with full signal bars.
If your number, data, and texts are all working, the transfer was successful. If not, recheck your carrier’s instructions or contact support for a new QR code.
Stay Connected During Device Switches with Jetpac eSIM
Switching to a new phone often means a few hours, or even days, without full service while your main carrier finishes activation. A simple workaround is to use a Jetpac International eSIM, which keeps you connected during the transition.
With Jetpac, you can activate data instantly on your new iPhone, even before your carrier's eSIM is fully transferred. It’s prepaid, requires no contracts, and works across multiple countries, perfect if you’re traveling or setting up your device away from home.
Why Jetpac eSIM is useful when transferring phones:
Works in 200+ destinations, including the U.S. and global travel hubs.
Instant setup via QR code, no physical SIM required.
Prepaid data plans, up to 70% cheaper than roaming.
5G speeds with automatic network switching for the best signal.
Unlimited hotspot sharing for laptops or secondary devices.
Voice calls available in 50+ countries starting at USD 1.99 for 5 minutes.
24/7 customer support through WhatsApp and email.
So even while your main plan is switching between devices, Jetpac eSIM ensures you never lose connectivity, perfect for staying online, verifying accounts, or navigating while setting up your new iPhone.
FAQs
Can I transfer my eSIM to another iPhone?
Yes, you can transfer your eSIM to another iPhone using Apple’s built-in Quick Transfer feature or by scanning a new QR code from your carrier. Both methods move your phone number and data plan safely to the new device.
Does an eSIM automatically transfer to a new phone?
It depends on your carrier. Some carriers support automatic eSIM transfer during iPhone setup, while others require you to reactivate the plan manually with a QR code. Always check your carrier’s eSIM policy before switching phones.
How to transfer eSIM from Android to iPhone 17 Pro?
To transfer eSIM from Android to iPhone 17 Pro, first delete or deactivate the eSIM on your Android device, then go to your iPhone’s Settings → Cellular → Add eSIM → Use QR Code and scan the activation code from your carrier.
Can I take my SIM out of my Android phone and put it in my iPhone?
If it’s a physical SIM, yes, simply insert it into your iPhone’s SIM slot. If it’s an eSIM, you’ll need to reactivate it on the iPhone using a QR code or your carrier’s app.
How do I transfer an eSIM to a new iPhone without my old one?
If you no longer have your old iPhone, contact your carrier and request a new eSIM QR code or use your carrier’s app for reactivation. Once received, go to Settings → Cellular → Add eSIM → Use QR Code and follow the prompts.
Can I transfer my eSIM while traveling internationally?
Yes, you can transfer your eSIM to a new iPhone while abroad as long as you have Wi-Fi and your carrier supports online reactivation. However, using an international eSIM like Jetpac is often easier for travelers since it provides instant global data during setup.
How long does it take to transfer an eSIM from one iPhone to another?
The process typically takes under five minutes if both devices are on Wi-Fi and your carrier supports eSIM Quick Transfer. For QR-based setups, activation may take slightly longer depending on carrier verification.